Posts Tagged ‘Development’
Apache 2 PHP module version switcher for Debian/Ubuntu
Update, see the part 2, also starring PHP 5.3 !
One of these days I thought of trying out a snapshot of the current development version of PHP‘s next major version, PHP 6. I’m using an alpha version of Ubuntu (Karmik alpha3), which behaves very nicely, and I thought to go all the way with this and try a dev version of PHP.
After installing some of the dependencies needed to compile PHP (dev versions of various system libraries and build tools), and tying without any luck to compile a tar.gz snapshot of PHP 6, I checked out the sources from SVN, and got it working. After much trial and error, I succeeded using this configure command:
./configure --with-apxs2=/usr/bin/apxs2 --with-mysql --prefix=/opt/php6 --with-regex --with-libxml-dir=/usr/lib --with-openssl=/usr/lib --with-pcre-regex --with-curl --enable-exif --with-gd --enable-gd-native-ttf --with-gettext --with-mhash --with-imap --with-imap-ssl --enable-mbstring --with-mcrypt --with-mssql --with-mysql --with-mysqli --enable-pcntl --with-pspell --with-libedit --with-readline --enable-shmop --enable-soap --enable-sockets --enable-sysvmsg --enable-sysvsem --enable-sysvshm --with-tidy --with-xmlrpc --with-xsl --with-openssl=/usr --with-kerberos --enable-embedded-mysqli=shared --with-pdo-mysql=shared --enable-shared=yes --with-fbsql=no --with-interbase=no --with-oci8=no --with-adabas=no --with-pdo-firebird=no --with-pdo-oci=no --with-pdo-odbc=no --with-pgsql=no --with-pdo-pgsql=no --with-recode=no --with-snmp=no --with-sybase-ct=no --enable-debug
After that, make and sudo make install. During the make install command, the script complained about httpd.conf not containig any LoadModule section. In Debian and Debian based distros, like Ubuntu, the Apache settings are split over multiple files. Every apache module has a .conf and a .load file in /etc/apache2/mods-available.
The .load file contains the specific LoadModule directive, and the .conf file contains module specific configurations. The reason for this is to make it simpler to activate/deactivate a specific module using the a2enmod and a2dismod commands, which create or destroy symlinks for the .conf and .load files from /etc/apache2/mods-available to /etc/apache2/mods-enabled. During Apache’s startup, it loads any .load files in the mods-available folder, then it loads any .conf files in the same folder.
I added a dummy LoadModule line in httpd.conf, and ran make install again. After that I took the LoadModule line injected by the install script into httpd.conf and put it in a file called php6.load in the mods-available folder, and reverted httpd.conf to the initial state (an empty file). Also I created a php.ini file in /opt/php6/lib/.
Then I disabled the php5 module with
sudo a2dismod php5 && sudo a2enmode php6 && sudo /etc/init.d/apache2 restart
and tested a phpinfo page. It worked 🙂 and I was happy.
But as I tested some of my apps in PHP6, I ran into some trouble and wrote this little script to help me easily switch between PHP versions to use when I’m researching or when I’m working. It uses a little program called zenity, which display all sorts of configurable GUI elements on the screen. Here it is:
#!/bin/bash php5="/etc/apache2/mods-enabled/php5.load" php6="/etc/apache2/mods-enabled/php6.load" apache="/var/run/apache2.pid" old="" if [ -e "$php5" ] then old="php5" enabled5="TRUE" else enabled5="FALSE" fi if [ -e "$php6" ] then old="php6" enabled6="TRUE" else enabled6="FALSE" fi if [ -e "$apache" ] then running="started" op="/etc/init.d/apache2 restart" else running="stopped" op="/etc/init.d/apache2 start" fi run=$(zenity --title "Switch PHP version" --list --text "Apache ($running) with PHP 5/6" --radiolist \ --column "Active" --column "run" --column "Version" --hide-column=2 \ "$enabled5" "php5" "Apache with PHP 5" \ "$enabled6" "php6" "Apache with PHP 6-DEV" \ ); if [ -z $run ] then exit fi if [ $run != $old ] then a2enmod $run a2dismod $old fi $op | zenity --progress --pulsate --auto-kill --auto-close --title "Applying changes ...." sleep 1 if [ -e "$apache" ] then zenity --info --text "Changes applied" elsezenity --error --text "An error occured, check the apache log" fi
I put this one in /opt/bin (this is the place where I put experimental stuff ) and called it apache-php (had a lack of imagination on the name). I also made a shortcut with a nice icon, so I can access it easily. Please note that you must run the script with gksudo, eg. “gksudo /opt/bin/apache-php”, because you need to be root to modify any settings in the /etc folder (or any system folder for that matter).
What this script does, is this; it looks for the php5.load and php6.load files in the mods-enabled folder, and displays a nice zenity dialog with the one enabled already selected, like the one in this picture
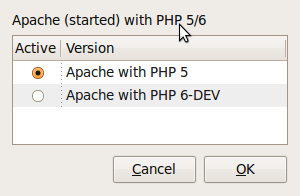
After selecting the desired PHP version, and you hit OK, a progress dialog appears for a short while, while the changes are being made:

and then, on completion a simple alert that informs of the completion of the process:

The script waits for Apache to restart, then waits one second and the checks for the Apache pid file ( /var/run/apache2.pid ). If the file is not there, it means that something went wrong, and an error box like this one is displayed;

Usually this should not happend, but if it does, something went wrong, and you have to check the Apache logs to find it.
I know that there are methods for running PHP5 and PHP6 in the same time, one as an Apache module and the other as FastCGI, but it adds unneeded complexity, and you can’t use the same file extension with both, which, in my humble oppinion, is not the proper way to use and test PHP6.
I hope this helps people who use different versions of PHP and like to switch version with a click. With a little imagination and tweaking, you could transform this script into a more complex one, for, let’s say enable and disable different Apache modules, or add more PHP versions, etc.
I encourage you to compile PHP 6 and try it, and report bugs back to the development team, because, besides letting them know that you’re interested in their work, you help them find bugs and fix them. Also, check this page for progress in the Unicode compatibility of different PHP functions and extensions.
Happy coding and compiling folks.
Home-baked SVN support for Komodo Edit
Komodo Edit (version 5.0.3 5.1.4 at the time of this writing) is my tool of choice for code editing. It is built on top of Mozilla and Scintilla with some Python glue, which gives it great flexibility (Firefox like extensions, custom lexer files etc.)
I am using Komodo Edit for web development, mainly PHP/HTML/Javascript on Ubuntu Intrepid 64bit, and I must say that I’m extremely satisfied with my setup. It is extremely fast and clutter free.
ActiveState has done a lot of work in making this great tool. They also have a commercial product that extends the editor with some pretty neat pieces of functionality (Komodo IDE). I also tried the IDE, but for my specific needs I’m sattisfied with the free version. I’m considering buying a licence for the IDE in the future.
There are a couple of notable differences between the two “dragons”, most important are the ability to handle version control systems and debuggers from within the IDE, but not from within the free edition.
Of course, there are other alternatives like Aptana, which is also a great tool (I’ve been using it for a while), but I don’t like having JRE installed if possible (less dependencies is better). I also like to be a little different, and give other products a fair chance to be used. It’s a matter of personal taste I guess. Other IDE’s offer integrated database editing tools. I use MySQL as the db layer on most of my projects, but I don’t actually need that into my code editor. I use MySQL Administrator, Query Browser and Workbench, and I’m pretty satisfied by those tools. It also allows me to concetrate on the specific part of the application (database design, database debug, code editing) without having all that functionality loaded into my editor all the time.
Now, returning to Komodo Edit, one thing that is not easy to do, is to work with a versioned local copy of a project. You have to keep a terminal window opened all the time, and fire some, let’s say, svn commit, svn add or svn update every time you modify something.
Subversion is widely used as a version control system, and it is available for all kinds of unix/linux flavours, mac, windows etc. We’re going to get rid of the terminal window and customize Komodo to do simple operations like commit or update.
How are going to do that? Well, one of the greatest things that Komodo offers is the possibility to add your own pieces of functionality into it, by using macros, snippets, commands, menus, toolbars etc. We’re going to create a toolbar and a couple of buttons that trigger some subversion commands. We already have subversion installed (we were using it from the command line, remember ?), so there are no other prerequisites required for our task. The advantage is that we rely solely on the official subversion binaries available to our system, which takes the weight of keeping it updated off our backs, as opposed to let’s say when we have our own subversion library and need to keep it updated.
This guide is for Linux only. It should also work in unix/mac os x. It does not work in windows, because windows lacks some system tools like awk or grep.
First, we make the right panel visible, and rightclick on the Samples (5.0.3 5.0.3)) folder, add -> New Custom Toolbar. We name it “my svn tools” and click ok.
Then we rightclick on the newly created toolbar and add -> Custom command, then fill the fields like this:
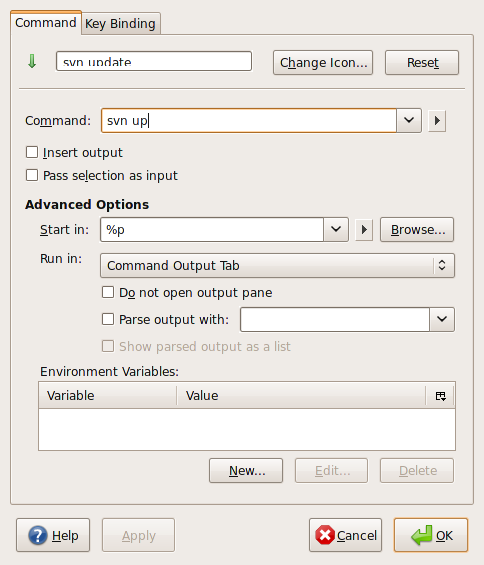
SVN update
You’ll notice that I also changed the command’s icon (I used the arrow_up icon from the FamFamFam Silk icon set which are offered for free under a CreativeCommons license). You can do that by clicking “Change icon”. You’ll notice the %d in the “Start in” advanced option. That means that the command will be run in the active project’s folder path. Pay much attention to this specific detail when you have more than one project opened.
Now let’s add a new command for svn commit:
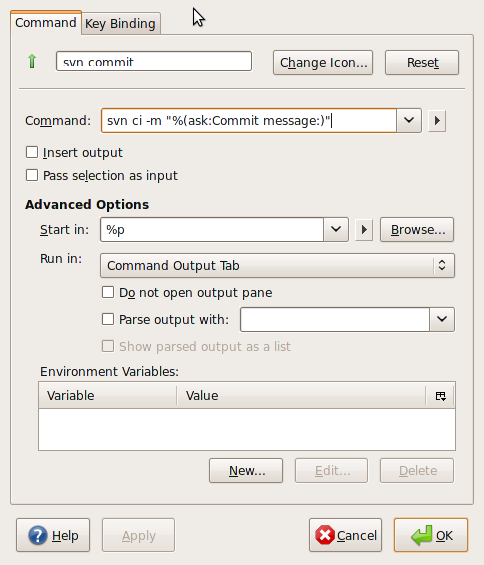
SVM commit properties
You will notice that this time we have something different in the Command field:
svn ci -m “%(ask:Commit message:)”
When you commit something, usually you have to write a commit message that describes the nature of the modifications you’ve made to the code (for example a fix for a specific trac ticket); that’s what the -m “message” does. For this, we are using the %(ask:dialog_title:default_value) construct that tells komodo to popup an input dialog with the title replaced with the dialog_title parameter, and the default value replaced with the default_value parameter. The default value is optional. In our case, when we fire that specific command, it will look something like this:

After using this a couple of times, you will notice that the field remembers older values that you entered, pretty much like a browser remembers what you tiped in a specific form input.
Now let’s add the svn cleanup command:
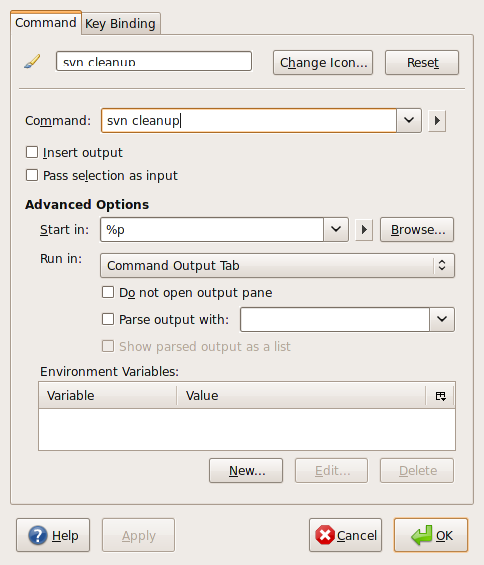
SVN cleanup
That was simple. I used the paitbrush icon.
What we need next is a command that adds newly created files into the versioning system.
I’ve used a code snippet from here. It looks like this:
for i in `svn st | grep ? | awk -F " " '{print $2}'`; do svn add $i; done
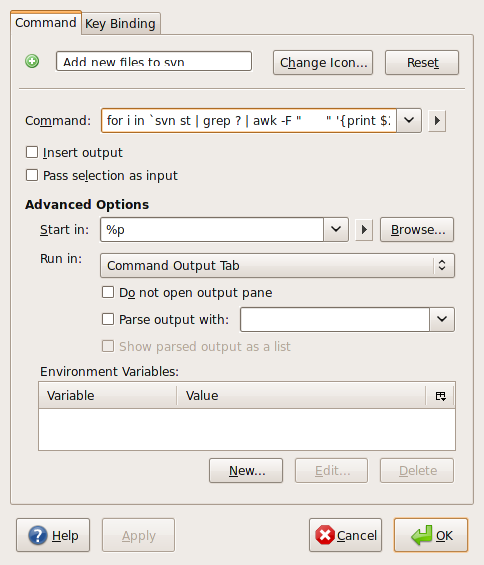
SVN add
I used the add icon from the FamFamFam icon set.
So far so good. It’s time to test our work. Go to the View menu -> Toolbars and check “my svn tools”. Your Komodo’s toolbar should look like this:

Toolbar
You will notice that our four commands appeared on the Komodo’s toolbar.
If you did everything right, you should be able to use those commands on any project that is versioned through subversion.
Very important: remember, in order for those commands to work properly, you must set the project you intend to use the tools as Active Project.
This is no a complete solution by far. I intend to dive more deeply into Komodo and it’s extensibility features, and hopefully implement a more complete solution that has let’s say all the important subversion commands.
Here is the exported toolbar package. Download and import it into your Komodo, play with it, modify it, make it look the way you like.
Happy coding !
UPDATE:
Here is how to do svn checkout:
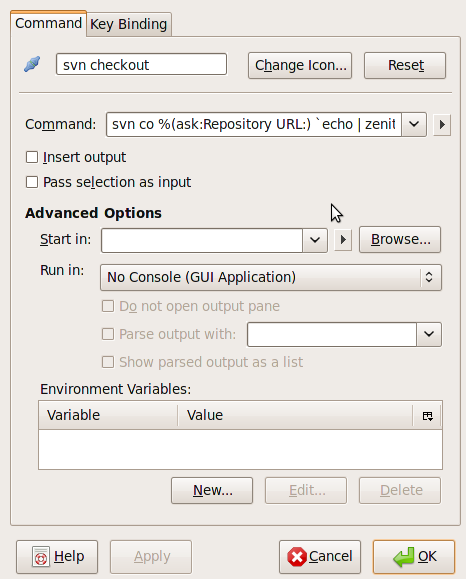
SVN checkout
The command uses the nice little program called Zenity (which makes dialogs). The command used for checkout is:
svn co %(ask:Repository URL:) `echo | zenity --file-selection --directory --title="Checkout SVN"` --username="%(ask:SVN username:anonymous)" --password="%(askpass:SVN password)" | zenity --progress --pulsate --title="SVN Checkout" --text="Please wait for the checkout to complete" --auto-kill --auto-close
You can download the kpz file from here, and import it into your Komodo. Enjoy !
